Guide: Modifying Pickups to fit Fly

Parts, mods, projects, and requests/concepts based on adaptations of Fly parts
Post Reply
User avatar
mmmguitar
Forum Veteran
Posts: 1297
Joined: Tue Oct 01, 2019 1:25 am
Contact:

Guide: Modifying Pickups to fit Fly

Post by mmmguitar »

Due to the 2020 production backlogs affecting many manufacturers, Fly owners are in the position of being unable to receive new pickups from Parker’s former OEMs (Dimarzio and Seymour Duncan). Fortunately, modifying F-spaced (approx. 51.05mm E-to-e) Dimarzios and other pickups to fit Fly cavities is not rocket surgery. This post summarizes three methods that vary only by degree of modification to the new and/or original pickups - None of them involve permanent modification to the Fly itself. For the benefit of squeamish Fly owners, this means that any competent guitar tech in a retail store should be able to perform this work with minimal fuss or tools. Because Seymour Duncans used in Mojos and later Flys require the least modification, this post will reference Gen 1/2 Dimarzios specifically.

Tools and parts used:
-The new pickup you wish to install in your Fly (51.05mm F-spacing necessary for methods 1 and 2)
-Current Fly pickup (If using methods 1 or 2)
-Soldering iron (as one would expect when swapping pickups)
-Small Phillips head screwdriver (for baseplate screws)
-Medium flathead screwdriver (for pickups with fillister bobbin screws, and for prying the bobbins from baseplates)
-Allen/hex wrench for 10-32 x 5/8" Dimarzio hex pole piece screws
-Tin snips/metal shears (for trimming pickup baseplates)
-Bolt cutters (for clipping bobbin screws)
-3M double-sided tape (in methods 2 and 3)

Note that a dremel cutting wheel can be used instead of snips and/or bolt cutters.

Method #1: Baseplate swap with transplanted bobbin screws

1. If installing an F-spaced Dimarzio, remove all fillister-bobbin screws or hex screws (depending on model). Remove four small Phillips head screws securing baseplate to bobbins. Bobbins and baseplate will typically be adhered together with wax from potting process and a grounding (generally bare or gray) wire soldered to a point on the plate and wound together with bobbin wires; so use a flathead screwdriver or other prying blade to gently separate them with a turn, then touch a hot soldering iron to the grounding joint on the baseplate to release the wire.

2. Unsolder installed Fly pickup wires. In most pre-refined Flys, the humbucker “start”/lead wire and series-connection wires will be soldered to the pickup selector switch. My suggestion is to unsolder and replace only one pickup’s leads from the switch at a time; so you don’t lose track of where they go and accidentally wire the switch “backwards”( or worse). The humbucker “finish”/ground wire and baseplate wire will be soldered to the bottom of a pot. In refined Flys (as well as pre-refined Fly Standards), the series-connection wires will be soldered to one of the middle lugs in the push/pull tone control’s 6 DPDT switch contacts. Once all of a pickup’s wires are unsoldered, unscrew the 3/32” hex pole pieces from the neck facing-coil under the A string and the bridge-facing coil under the B string until the pickup can be removed (strings must be removed or totally loosened on guitar to accommodate this). If the adhesive spacer from the bottom of the pickup has somehow remained in the pickup cavity, remove and put it back on the pickup baseplate. As in step 1, separate the Fly pickup’s bobbins and baseplate and unsolder ground wire from baseplate.

3. If installing an F-space Dimarzio humbucker with two rows of hex pole pieces, transplant the ones from the original Fly pickup bobbins into the new pickup. If your new pickup has only one set of fillister screws, then transplant only the one row of screws. Disclaimer: Pickup bobbins are soft enough that you can thread/force screws of differing threads through the bobbin holes, provided the diameter of the screws and holes are compatible. Unfortunately, I’ve found Dimarzio screw and bobbin hole diameters inconsistent through eras and models - It ends up being something that you just troubleshoot in the middle of the job.

Note that one requires only a single mounting screw (one of the two long ones from the original pickup) to mount a pickup to a Fly. So if your new pickup has a bobbin with slugs that you’re wanting to replace with hex screws, you’’ll need to go through the trouble of pushing the slugs out and modifying the bobbin to accept the donor hex screws that will be of a much smaller diameter (such as with a filler or glue or some sort). Due to the extra trouble, I won’t recommend such an endeavor in this guide. On a similar note, those preoccupied with preserving the fillister screw-aesthetic can clip five of the screws (as detailed in Method #2) to be flush with the bottom of the bobbin, then obtain a 10-32 x 5/8" fillister screw to transplant (instead of the Fly pickup’s hex screws) that will mate with the threaded insert in the Fly pickup cavity.

4. Solder the new pickup’s baseplate-grounding wire to the Fly pickup baseplate, make sure the bobbins’ wires are tucked out of the way, then reattach the baseplate to the bobbins with the small Phillips screws (the flat head screws originally on the Fly baseplate - not the round head screws from the new pickup’s baseplate).

5. The new pickup should now be ready to install. Fit it into the cavity, thread the one or both mounting screws into the body while the pickup baseplate is flush against the bottom of the cavity rout, then solder the new pickup’s wires to the switch contacts and pot bottoms the old ones were. Note that the stock Fly pickups are wound with the same phase and polarity; so reversing these to make them compatible in the middle pickup switch position is why one Fly pickup will use different color groupings of the wires from the other (eg. One has a red start, white/black series, green/bare finish, while the other has something like white start, red/green series, black/bare finish ) - Just recreate the same wire color arrangements in the new pickup as you saw in the one you removed. If you end up with the pickups out of phase, reverse the start/finish wires of one pickup. If you have hum between the two when split (as in switch position 2 in a pre-refined Fly), unscrew one of the pickup’s baseplates and flip the orientation of the bar magnet. If you have both problems at once, then try both fixes together.

Method #2: Baseplate swap with modified screws

In this method, you’re performing most of the above steps, but without transplanting screws. In a typical humbucker, the slug pole pieces are flush with the bottom of the bobbin, whereas the screws in the other bobbin can extend 1/2” or more below the baseplate. Because Fly pickup baseplates are designed to be mounted flush with the bottom of the guitar’s pickup cavity rout, you must shorten the new pickup’s screws before the Fly baseplate can be transplanted onto it. This can be accomplished by removing the new pickup’s screws one at a time, (carefully) clipping a sufficient length off the ends of each screw with bolt cutters, then reinstalling them in the bobbin. The bobbin material is soft-enough that we needn’t worry about the damaged ends of the clipped screw not threading into the bobbin - a turn of the driver should be sufficient to screw the cylinder in.

Unless you’re transplanting one or both of the original Fly pickup’s mounting screws, you’ll need a double-sided adhesive to hold the new pickup in the cavity rout. Simple enough, right? Though this adds some extra height to the pickup, it avoids modifying the guitar, itself. Note that mounting with tape or another adhesive means you’re no longer constrained to Dimarzio F-spacing for any reason, other than aesthetics.

Method #3: Modified baseplate and screws

In this method, we’re utilizing the previous two methods’ steps, minus the transplanting of anything from the original pickup. You simply take any humbucker (of any pole spacing) with bobbins of similar depth to the Fly pickups, remove/clip/reinstall the screws to ensure they’re no longer proud of the baseplate, then clip off the baseplate mounting tabs with metal shears. From there, trim the baseplate around the perimeter of the bobbins, taking care to not clip any wires.

Because the Fly pickup baseplate has a corner removed for the wires to snake out of, you must clip the corner of the hole punched in the bottom corner of the typical humbucker baseplate that the wires are snaked through the bottom of. It’s the scariest step, but necessary.

Test-fit and trim baseplate radius until it fits. Mount with double-sided tape, and the hard part’s done. Be aware that typical humbucker baseplates have round-head screws securing it to the bobbins, as opposed to the flat-headed screws used to ensure the Fly baseplate is flush. The 3M double-sided tape I use is of sufficient thickness that the added height of the baseplate screws is a non-issue. That said, you can file them down and hopefully have enough to grab onto with a driver (or extractor bit :D )

Anyone who’s even considered transplanting pickups using alternative methods, please chime in. I mainly wanted to share the simplest, least-invasive jerry-rigging one can utilize.

Image
Pictured is an umodified, F-space Dimarzio humbucker next to one one that has had its baseplate and fillister screws trimmed. Only double-sided tape is required to mount the modified pickup in a Fly. Also pictured: My lint-covered black t-shirt I set the parts on for these photos.

Image
A Dimarzio filister screw next to Fly mounting hex screw

Image
Filister screw next to the short hex screws used as ten of the Fly pickup's polepieces. This shows just how much of the filister screw must be clipped in methods 2 and 3.

Image
Pictured here is a single row of Fly pickup hex polepieces transplated into a typical slug/screw humbucker. A baseplate swap or trim is all that is required before this pickup can be installed in a Fly.

Image
Here is a comparison of a typical F-space Dimarzio humbucker baseplate to the Fly baseplate. Note the flush baseplate screws on the Fly pickup, versus the round-head screws on the typical humbucker. Depending on which mounting method is used, the screws may need to be either replaced or compensated for with cushion material (such as the stock Fly pickup baseplate cushion, some double-sided 3M tape if screw-mounting is foregone, or even common weather stripping or similar material).

Image
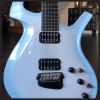
Pictured: A typical result.

#DIYGuides #PickupPreferences
Summary of the Parker Guitars speculator market from 2020 onward: https://en.wikipedia.org/wiki/Greater_fool_theory
User avatar
vjmanzo
Site Admin
Posts: 2049
Joined: Sat Feb 02, 2019 12:35 pm
Location: New York, NY
Contact:

Re: Guide: Modifying Pickups to fit Fly

Post by vjmanzo »

This is a terrific guide, @mmmguitar!! Thanks so much for writing this!! Very helpful!
KenanJ
Jr. Member
Posts: 64
Joined: Thu Sep 28, 2023 8:09 am
Location: France

Re: Guide: Modifying Pickups to fit Fly

Post by KenanJ »

Hi @mmmguitar
I just read your wonderful guide and I've thought would it be possible to 3d print a baseplate a transplant the bobins in it?
User avatar
mmmguitar
Forum Veteran
Posts: 1297
Joined: Tue Oct 01, 2019 1:25 am
Contact:

Re: Guide: Modifying Pickups to fit Fly

Post by mmmguitar »

KenanJ wrote: Tue Sep 03, 2024 10:25 am would it be possible to 3d print a baseplate a transplant the bobins in it?
I don't see why not; if you have the resources. Just remember that the baseplate needs to have a grounding point for the whole assembly, and that the screw heads holding the baseplate to the bobbins which Dimarzio uses are flat in the Fly pickups, and round in all their other pickups (allowing the direct-mounted Fly pickup baseplates to sit flush within the routs).

Thanks again for the kind words.
Summary of the Parker Guitars speculator market from 2020 onward: https://en.wikipedia.org/wiki/Greater_fool_theory
KenanJ
Jr. Member
Posts: 64
Joined: Thu Sep 28, 2023 8:09 am
Location: France

Re: Guide: Modifying Pickups to fit Fly

Post by KenanJ »

Thanks again for the kind words.


You truly provide great ressources for parker geeks out there :p.

KenanJ wrote: Tue Sep 03, 2024 10:25 am would it be possible to 3d print a baseplate a transplant the bobins in it?
mmmguitar wrote: Tue Sep 03, 2024 3:07 pm I don't see why not; if you have the resources. Just remember that the baseplate needs to have a grounding point for the whole assembly, and that the screw heads holding the baseplate to the bobbins which Dimarzio uses are flat in the Fly pickups, and round in all their other pickups (allowing the direct-mounted Fly pickup baseplates to sit flush within the routs
I’m thinking maybe put an metal insert for the ground the only question left is that if we can find the screws matching so we can make the pickup sit flush it not I can just remove so material to the plate for the double sided tape so we don’t have excess height
KenanJ
Jr. Member
Posts: 64
Joined: Thu Sep 28, 2023 8:09 am
Location: France

Re: Guide: Modifying Pickups to fit Fly

Post by KenanJ »

@mmmguitar would you be able to provide all measurements of a baseplate in millimeters so I can model it ?
User avatar
mmmguitar
Forum Veteran
Posts: 1297
Joined: Tue Oct 01, 2019 1:25 am
Contact:

Re: Guide: Modifying Pickups to fit Fly

Post by mmmguitar »

KenanJ wrote: Wed Sep 04, 2024 10:46 am would you be able to provide all measurements of a baseplate in millimeters so I can model it ?
I measured a few spare pickups with the fiberboard baseplates; and found that the top and bottom widths range from 68.74mm to 68.88mm, with the lengths of the sides ranging from 37.39mm to 37.43mm. The diagonal cutaway for the 4 conductor wires and baseplate ground wire to exit the assembly is cut 7mm in from the edge at the top. The screw holes for securing the baseplate to the bobbin range between 13.44mm-13.47mm from the side edges of the baseplate to the center of the hole, and 9.43mm to. 9.49mm from the top and bottom edges of the baseplate to the hole center. The holes for the two pole piece mounting screws are both consistently drilled approximately 18.79mm in from the side edges to the hole center, and range from 9.39mm to 10.36mm from the top or bottom edge of the baseplate to the hole center. The measured thickness of Fly pickup baseplate materials from different eras ranged 1.84mm to 1.9mm. The measured spacing between the pickup baseplate screws ranged from 39.52mm to 40.1mm side-to-side (center of screw holes), a fairly consistent 16.15mm from top to bottom, and a 33.92mm straight line distance between the holes for the pole piece mounting screws seemed to work between all measured examples.

Illustration to make sense of the range of measurements:

(View from underside of assembled pickup)

fly pickup baseplate.png
fly pickup baseplate.png (8.71 KiB) Viewed 2394 times
It would be prudent to produce a template by tracing one of your own pickups, to measure any prototypes against as you dial in the final design.
Summary of the Parker Guitars speculator market from 2020 onward: https://en.wikipedia.org/wiki/Greater_fool_theory
User avatar
Patzag
Forum Veteran
Posts: 606
Joined: Wed May 22, 2019 10:52 am

Re: Guide: Modifying Pickups to fit Fly

Post by Patzag »

mmmguitar wrote: Wed Sep 04, 2024 5:25 pm
I measured a few spare pickups with the fiber baseplates; and found that the top and bottom widths range from 68.74mm to 68.88mm, with the lengths of the sides ranging from 37.39mm to 37.43mm. The diagonal cutaway for the 4 conductor wires and baseplate ground wire to to exit the assembly is cut 7mm in from the edge at the top. The screw holes for securing the baseplate to the bobbin range between 13.44mm-13.47mm from the side edges of the baseplate to the center of the hole, and 9.43mm to. 9.49mm from the top and bottom edges of the baseplate to the hole center. The holes for the two pole piece mounting screws are both consistently drilled approximately 18.79mm in from the side edges to the hole center, and range from 9.39mm to 10.36mm from the top or bottom edge of the baseplate to the hole center. The measured thickness of Fly pickup baseplate materials from different eras ranged 1.84mm to 1.9mm.
You could've tried to be a little more precise! :lol: :lol: :lol:
User avatar
mmmguitar
Forum Veteran
Posts: 1297
Joined: Tue Oct 01, 2019 1:25 am
Contact:

Re: Guide: Modifying Pickups to fit Fly

Post by mmmguitar »

Patzag wrote: Wed Sep 04, 2024 6:25 pm You could've tried to be a little more precise! :lol: :lol: :lol:
Edit: I ended up agreeing that I could; and added a few more numbers.

What I learned from these variations is that, apparently, each Fly baseplate was made-to-order with hand tools in Larry Dimarzio's Staten Island shop by removing the mounting tabs and one corner of a standard-sized fiberboard pickup baseplate, drilling two holes for the mounting pole piece screws with a template, then radiusing the baseplate corners and smoothing the edges by hand. Now @KenanJ can decide whether he wants to err on reproducing the smaller or larger ranges of the baseplate's footprint.
Summary of the Parker Guitars speculator market from 2020 onward: https://en.wikipedia.org/wiki/Greater_fool_theory
KenanJ
Jr. Member
Posts: 64
Joined: Thu Sep 28, 2023 8:09 am
Location: France

Re: Guide: Modifying Pickups to fit Fly

Post by KenanJ »

@mmmguitar You're a beast ! I will try if I can mix your way of retrofitting hums in the fly with 3d printed baseplates, I think it would save some elbow grease, even if the method DiMarzio used that you described if not out of reach for any newbie I think it's a bit painful to do all the drilling and cutting of the metal baseplate when we can 3d printed if espcially when the utility of the baselpalte material is not curcial except for the grounding that can be made with metal insert in the printed part.

My last interrogation would be the pole pieces, I know we can retrofit the two pole pieces in existing DiMarzios but can we in the duncans? The poles looks a bit different!

Thanks again for all the numbers :)
User avatar
mmmguitar
Forum Veteran
Posts: 1297
Joined: Tue Oct 01, 2019 1:25 am
Contact:

Re: Guide: Modifying Pickups to fit Fly

Post by mmmguitar »

KenanJ wrote: Thu Sep 05, 2024 2:52 am I know we can retrofit the two pole pieces in existing DiMarzios but can we in the duncans? The poles looks a bit different!
The Duncans used in the Fly Mojo were standard JB/Jazz "Hot rodded humbucker set" pickups with their mounting tabs clipped. The Mojo pickup routs had holes drilled for the four center screw polepieces to rest in, and inserts for the outside E string screws to thread into. If you're talking about transplanting Duncan pickups (with a single row of screws) into the Dimarzio Fly routs, you would have only the A string screw polepiece available for mounting, and would either have to drill holes in the replacement baseplate and rout for the other screw pole piece ends to rest in, or cut the screws short so that they didn't protrude through the bottom of the baseplate.
Summary of the Parker Guitars speculator market from 2020 onward: https://en.wikipedia.org/wiki/Greater_fool_theory
KenanJ
Jr. Member
Posts: 64
Joined: Thu Sep 28, 2023 8:09 am
Location: France

Re: Guide: Modifying Pickups to fit Fly

Post by KenanJ »

Based on that your preferred method for duncans would be just double sided tape them?
I'm just confised why can't we transplant duncans bobins to fly size baseplate like you explained in your thread.
User avatar
mmmguitar
Forum Veteran
Posts: 1297
Joined: Tue Oct 01, 2019 1:25 am
Contact:

Re: Guide: Modifying Pickups to fit Fly

Post by mmmguitar »

KenanJ wrote: Thu Sep 05, 2024 3:10 am I'm just confised why can't we transplant duncans bobins to fly size baseplate like you explained in your thread.
If we're talking about transplanting a Duncan bobbin to a prefabricated Dimarzio Fly pickup baseplate, it comes down to whether the spacings for the pole piece and baseplate screw holes are close enough to be interchangeable. Duncan's "Trembucker" E-to-e polepiece spacing is 52.6mm, as opposed to Dimarzio's 51.05mm "F" spacing.
Summary of the Parker Guitars speculator market from 2020 onward: https://en.wikipedia.org/wiki/Greater_fool_theory
Post Reply