Page 1 of 1
Re: 2011 Trans Honey Supreme
Posted: Wed Jun 24, 2020 12:58 pm
by hapsong
thanks for the great info here -
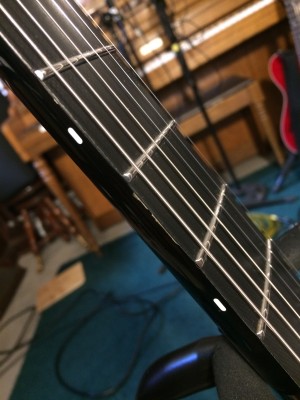
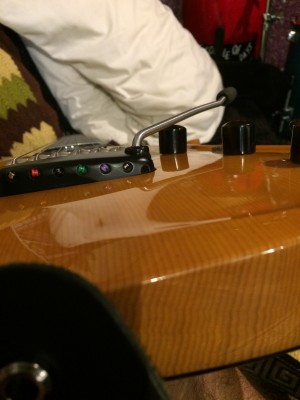
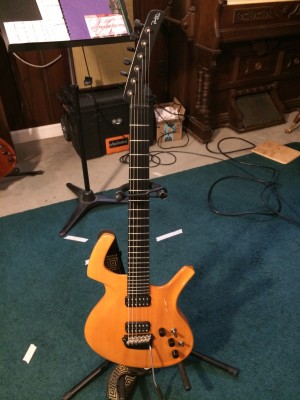
Indeed, I spent the last two days tweaking my 2008 Artist - I just could't get everything to settle in as nicely as my 2004 Mojo - adjusted the truss rod, set the action and buzzing between the 5-8 frets on the first string - back and forth with truss and bridge adjustments - I've mitigated the buzzing so it's playable but I cannot intonate several of the strings as there's not enough room to move the saddles forward .. a bit frustrating but not horribly off - I've managed to get the action around 1.6mm at the 12th fret on the high E which is fine - on my Mojo it's around 1.25mm .. I have to lower the bridge on that side quite a bit to get there, to the point that the vibrato arm tension screw almost sits below the body (photo) .. also, I've noticed some chipping on the edge of the neck around the 3-4 frets on the Low E side (see photos) - not sure if this is causing into my issues or not. And I don't know what others steps I can take to remedy this - any suggestions would be helpful. That all being said, the guitar sounds amazing, incredibly warm, much more so than the Mojo which I also love .. and this Artist has the chunkier neck profile which I don't prefer to the thin feel of my Mojo. I took a gamble on this guitar about 6 months back as it was incorrectly listed as a Classic - I got it for under 2k .. the paint chipping on the neck didn't start to show until a month or two after I received it..


Fly Artist Setup
Posted: Wed Jun 24, 2020 1:11 pm
by vjmanzo
HI @hapsong; I've moved this topic to a new thread.
Re: 2011 Trans Honey Supreme
Posted: Wed Jun 24, 2020 1:18 pm
by vjmanzo
hapsong wrote: ↑Wed Jun 24, 2020 12:58 pm
I've noticed some chipping on the edge of the neck around the 3-4 frets on the Low E side (see photos) - not sure if this is causing into my issues or not. And I don't know what others steps I can take to remedy this - any suggestions would be helpful.
hapsong wrote: ↑Wed Jun 24, 2020 12:58 pm
I got it for under 2k .. the paint chipping on the neck didn't start to show until a month or two after I received it..
Great score,
@hapsong! Looks terrific!
Others may have thoughts about the setup, but the chipping paint that started four months ago could
very likely be an indicator that your home is too dry during the winter months (common issue). Do you have a humidifier set up? If you don't keep the Fly at 40%-50% relative humidity then you're in risky territory--especially for a 2008 model as there is a known issue related to the epoxy used on fingerboards that summer. Fretboard lifting can occur if the r.h. is too low.
Re: 2011 Trans Honey Supreme
Posted: Wed Jun 24, 2020 2:05 pm
by hapsong
vjmanzo wrote: ↑Wed Jun 24, 2020 1:18 pm
hapsong wrote: ↑Wed Jun 24, 2020 12:58 pm
I've noticed some chipping on the edge of the neck around the 3-4 frets on the Low E side (see photos) - not sure if this is causing into my issues or not. And I don't know what others steps I can take to remedy this - any suggestions would be helpful.
hapsong wrote: ↑Wed Jun 24, 2020 12:58 pm
I got it for under 2k .. the paint chipping on the neck didn't start to show until a month or two after I received it..
Great score, @hapsong! Looks terrific!
Others may have thoughts about the setup, but the chipping paint that started four months ago could
very likely be an indicator that your home is too dry during the winter months (common issue). Do you have a humidifier set up? If you don't keep the Fly at 40%-50% relative humidity then you're in risky territory--especially for a 2008 model as there is a known issue related to the epoxy used on fingerboards that summer. Fretboard lifting can occur if the r.h. is too low.
Good suggestions VJ - indeed, I've been running a humidifier during the winter months (which are many in Vermont) and maintain humidity around 50% - I also run a dehumidifier during the summer and shoot for between 50-60% .. thanks!
Re: Fly Artist Setup
Posted: Wed Jun 24, 2020 2:24 pm
by vjmanzo
Okay--that's a very good sign! I have a few Flys with chips in that area and, as long as the fretboard isn't lifting, then you're good and you can just fill it in as needed and touch it up.
FWIW--I try to set up my Flys exactly the same, but it doesn't always work out for me that way, particularly with my 2007+ Flys. The reality appears to be that quality control in Mundelein was not on par with what it was in Wilmington; that reality just is what it is, but, in my opinion, it doesn't mean that 2004+ Flys are junk. I have a 2007 Deluxe that has its truss rod fully turned and the neck needed to be, effectively, bent back into shape over time; the action was so-so, but a quality tech can work with that to, for example, find a straight line by adjusting the nut, the bridge height, and leveling frets slightly as needed. Again: not the most savory thing to do with a high-end instrument, but, when you consider the major amount of work that is routinely done to high-end instruments world-wide, it's not unprecedented.

The trick is to find a knowledgeable tech you can trust if you personally are not certain what can be done. For the $2k you spent on that Artist, if you sink another $350 into getting it set up rock solid, in my opinion you are still way ahead of the game by a longshot!
Re: Fly Artist Setup
Posted: Wed Jun 24, 2020 6:25 pm
by hapsong
thanks for the info VJ - no, fretboard lifting that I can see. What do you use to fill and touch up those spots with?
I agree, the general build quality on my early-2004 Mojo is much better than the 2008 Artist. I thought about filing the nut for 10's to see if that helps move things into place a bit better. Save that, I'll probably take it in for some fret work or an entirely new nut. I noticed the nut slot on my low E doesn't line up directly with the tuner but is in perfect alignment with the edge of the neck (and the A string) the entire distance (see photo) .. not sure if I should mess with that as well.
Re: Fly Artist Setup
Posted: Wed Jun 24, 2020 7:46 pm
by vjmanzo
That’s great to hear, Greg!
I’ve heard that people use CA glue for gaps in guitar finish, but I don’t have any first-hand experience with that.
The graphite Fly nuts, during Ken’s time at least, were cut with a press that, long story short: precisely cut all of the slots perfectly each and every time! But they were cut for 9s! I use 10s as well, and, in my experience, the g string is the only tight fit. I definitely agree that it’s worth it to have the nut and frets looked at.
The frets, in principle, should be perfect, because of the design and workflow Ken devised (with the fretboard), but, sadly, it’s not always the case. It’s still a great concept, but not always something that was QC’d effectively.
I’ve definitely seen that slightly misplaced tuner alignment on a Fly before on the old forum; maybe it was even this guitar! Are you able to tell of the break angle is “too” drastic?
Re: Fly Artist Setup
Posted: Wed Jun 24, 2020 9:45 pm
by hapsong
the break angle behind the nut looks fine .. it's almost as if the tuner is shifted a bit too far to the right on the headstock ..
what is CA glue?
Re: Fly Artist Setup
Posted: Wed Jun 24, 2020 9:56 pm
by vjmanzo
hapsong wrote: ↑Wed Jun 24, 2020 9:45 pm
what is CA glue?
Just superglue, really; from what I gather, the idea is that a drop of superglue can fill the gap. Someone experienced with guitar finishes would know better.
Re: Fly Artist Setup
Posted: Sun Jul 05, 2020 9:49 pm
by billy
Congrats on the artist, great score- love mine!
For the paint chips on the side of the neck, use a sharpie to blend the color and then put a little ca (super) glue over it. You can gently sand and polish the glue out to be nearly invisible (per YouTube vids), or just try to apply as smoothly as you can to help prevent it from chipping further.
For the intonation, check for leaning bridge posts, where the bridge will sit a little too close to the neck. There’s a really awesome guide available

should you need to address leaning posts. Also check that the spring tension is set properly, this can also cause intonation issues.
As for the tuning machine alignment, usm updated the neck width to be slightly wider, not sure exactly when, but they didn’t also adjust the tuning machine placement to preserve the straight string paths past the nut as with earlier guitars. It would mean turning the entire tuning machine column and the headstock angle a bit clockwise to maintain a consistent spacing. You can see it a little bit on the a and d strings too. Yours looks more extreme than others I’ve seen but it shouldn’t cause any actual issues aside from aesthetics.
Re: Fly Artist Setup
Posted: Mon Jul 06, 2020 4:17 pm
by hapsong
billy wrote: ↑Sun Jul 05, 2020 9:49 pm
For the intonation, check for leaning bridge posts, where the bridge will sit a little too close to the neck. There’s a really awesome guide available

should you need to address leaning posts. Also check that the spring tension is set properly, this can also cause intonation issues.
Thanks billy - I appreciate the info .. my spring tension is good, using in down-only mode but can slide the step-stop to floating w/o it going out of tune .. I need to ask about the awesome guide available for the leaning bridge posts .. where can I access one?
Re: Fly Artist Setup
Posted: Mon Jul 06, 2020 4:32 pm
by vjmanzo
billy wrote: ↑Sun Jul 05, 2020 9:49 pm
There’s a really awesome guide available

should you need to address leaning posts.
hapsong wrote: ↑Mon Jul 06, 2020 4:17 pm
I need to ask about the awesome guide available for the leaning bridge posts .. where can I access one?
That awesome guide is available
here!
Re: Fly Artist Setup
Posted: Mon Jul 06, 2020 11:49 pm
by hapsong
great - just checked the guide and think I can figure it out .. just ordered some stabilizer rings on ebay .. thanks to you both!
Re: Fly Artist Setup
Posted: Wed Aug 26, 2020 4:06 pm
by hapsong
billy wrote: ↑Sun Jul 05, 2020 9:49 pm
Congrats on the artist, great score- love mine!
For the paint chips on the side of the neck, use a sharpie to blend the color and then put a little ca (super) glue over it. You can gently sand and polish the glue out to be nearly invisible (per YouTube vids), or just try to apply as smoothly as you can to help prevent it from chipping further.
Hi Billy - just getting around to working on my Artist - can you provide a link to a YouTube video that you're referencing above for sanding and polishing the super glue.. thanks!
Re: Fly Artist Setup
Posted: Sat Oct 10, 2020 8:24 pm
by billy
Re: Fly Artist Setup
Posted: Sun Oct 11, 2020 8:22 pm
by hapsong
thanks Billy !!